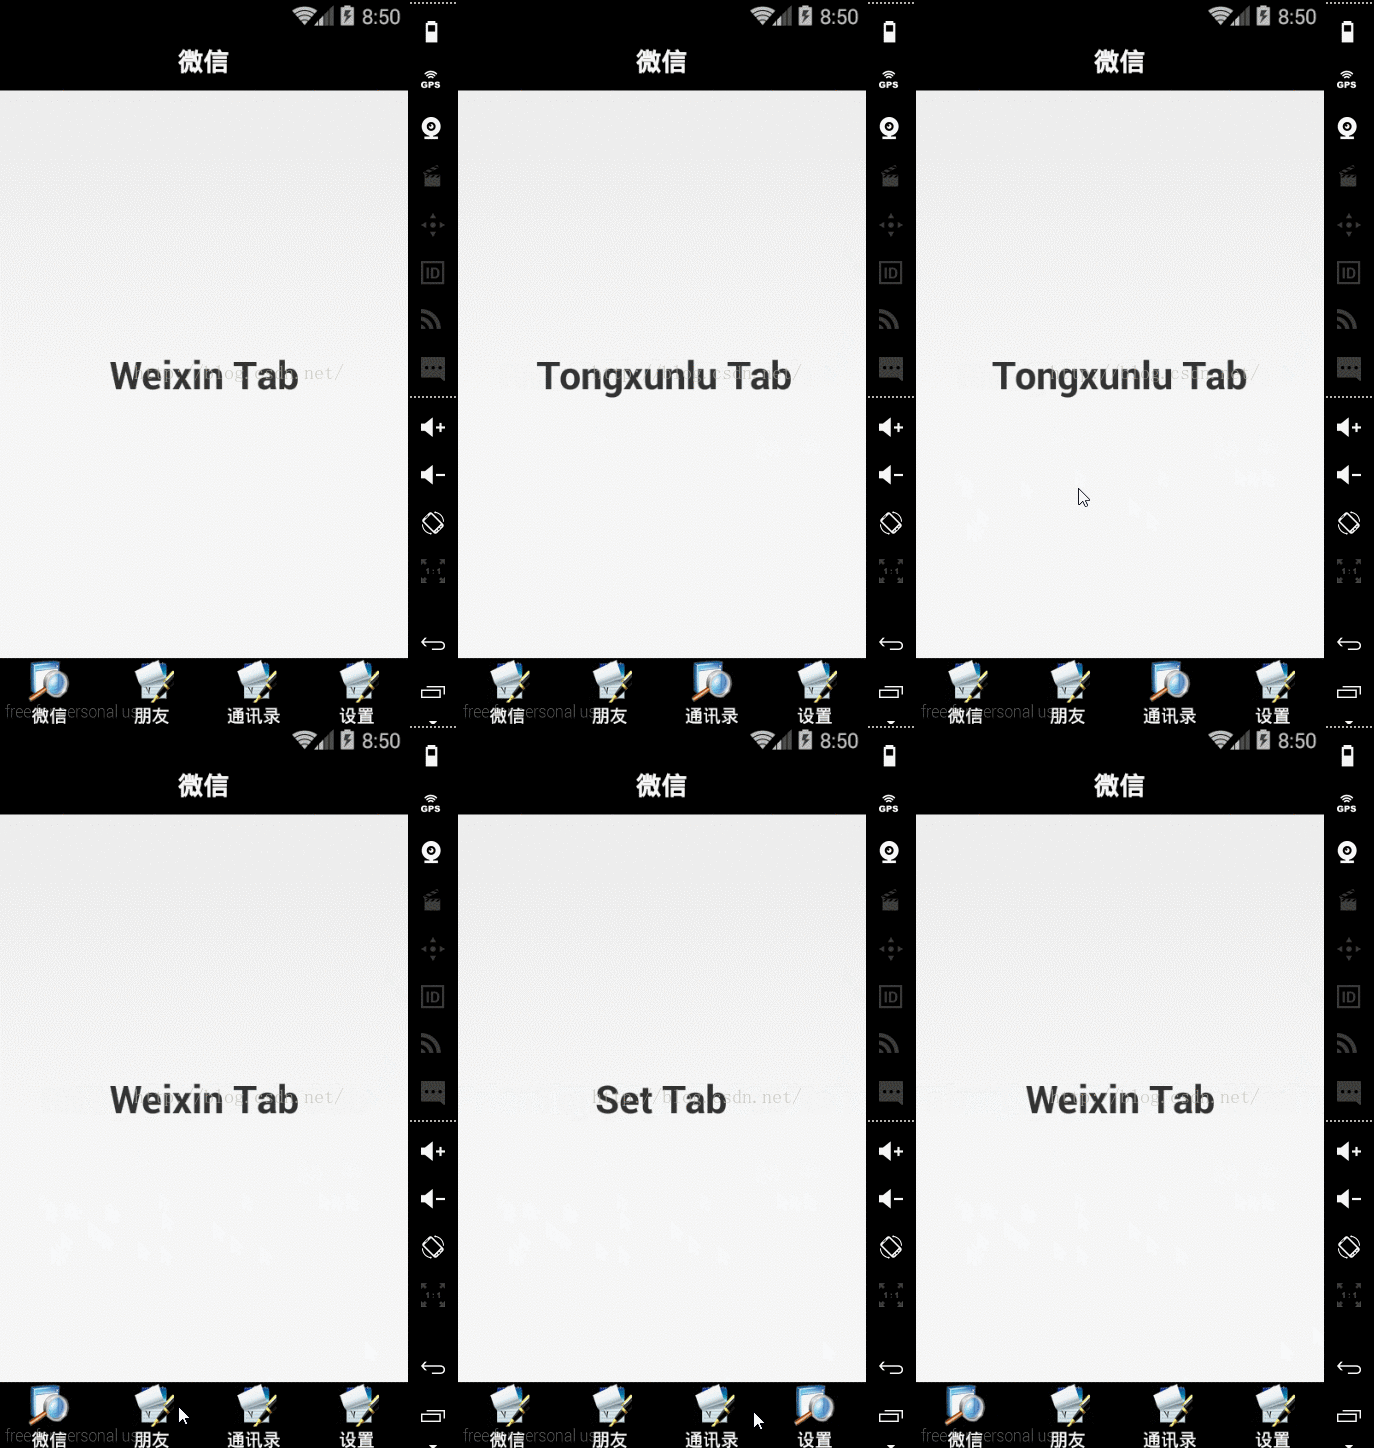
本文实例为大家分享了Android仿微信左右滑动点击切换页面和图标的具体代码,供大家参考,具体内容如下
目标效果:

使用鼠标滑动屏幕或者点击下边的小图标,可以更改页面和图标,因为没有那么多素材所以只用了两张图片区分。
1.layout文件夹下新建top.xml页面,作为顶部标题。
top.xml页面:
<?xml version="1.0" encoding="utf-8"?>
<LinearLayout xmlns:android="http://schemas.android.com/apk/res/android"
  android:layout_width="match_parent"
  android:layout_height="45dp"
  android:gravity="center"
  android:background="#000000"
  android:orientation="vertical" >

  <TextView
    android:layout_width="wrap_content"
    android:layout_height="wrap_content"
    android:text="微信"
    android:textColor="#ffffff"
    android:textSize="20sp"
    android:layout_gravity="center"
    android:textStyle="bold" />

</LinearLayout>
2.新建bottom.xml页面,作为底部导航。
bottom.xml页面:
<?xml version="1.0" encoding="utf-8"?>
<LinearLayout xmlns:android="http://schemas.android.com/apk/res/android"
  android:layout_width="match_parent"
  android:layout_height="55dp"
  android:background="#000000"
  android:orientation="horizontal" >

  <!-- ImageButton没加android:clickable="false"时,点击下方的ImageBuutton不会改变页面,点击TextView才会改变页面,这是因为每个tab是一个LinearLayout,每个LinearLayout都有一个ImageButton,当点击ImageButton位置时,点击事件首先会到LinearLayout上,LinearLayout会去判断,发现内部有一个ImageButton可以解决点击事件,所以就把点击事件交给ImageButton,而ImageButton又没有写点击事件,所以点击事件就失效了。-->

  <LinearLayout
    android:id="@+id/tab_weixin"
    android:layout_width="0dp"
    android:layout_height="fill_parent"
    android:layout_weight="1"
    android:gravity="center"
    android:orientation="vertical" >

    <ImageButton
      android:id="@+id/tab_weixin_img"
      android:layout_width="wrap_content"
      android:layout_height="wrap_content"
      android:background="#000000"
      android:clickable="false"
      android:src="@drawable/search" />

    <TextView
      android:layout_width="wrap_content"
      android:layout_height="wrap_content"
      android:text="微信"
      android:textColor="#ffffff" />
  </LinearLayout>

  <LinearLayout
    android:id="@+id/tab_friend"
    android:layout_width="0dp"
    android:layout_height="fill_parent"
    android:layout_weight="1"
    android:gravity="center"
    android:orientation="vertical" >

    <ImageButton
      android:id="@+id/tab_friend_img"
      android:layout_width="wrap_content"
      android:layout_height="wrap_content"
      android:background="#000000"
      android:clickable="false"
      android:src="@drawable/study" />

    <TextView
      android:layout_width="wrap_content"
      android:layout_height="wrap_content"
      android:text="朋友"
      android:textColor="#ffffff" />
  </LinearLayout>

  <LinearLayout
    android:id="@+id/tab_tongxunlu"
    android:layout_width="0dp"
    android:layout_height="fill_parent"
    android:layout_weight="1"
    android:gravity="center"
    android:orientation="vertical" >

    <ImageButton
      android:id="@+id/tab_tongxunlu_img"
      android:layout_width="wrap_content"
      android:layout_height="wrap_content"
      android:background="#000000"
      android:clickable="false"
      android:src="@drawable/study" />

    <TextView
      android:layout_width="wrap_content"
      android:layout_height="wrap_content"
      android:text="通讯录"
      android:textColor="#ffffff" />
  </LinearLayout>

  <LinearLayout
    android:id="@+id/tab_set"
    android:layout_width="0dp"
    android:layout_height="fill_parent"
    android:layout_weight="1"
    android:gravity="center"
    android:orientation="vertical" >

    <ImageButton
      android:id="@+id/tab_set_img"
      android:layout_width="wrap_content"
      android:layout_height="wrap_content"
      android:background="#000000"
      android:clickable="false"
      android:src="@drawable/study" />

    <TextView
      android:layout_width="wrap_content"
      android:layout_height="wrap_content"
      android:text="设置"
      android:textColor="#ffffff" />
  </LinearLayout>

</LinearLayout>
这里注意ImageButton的clickable属性,如果不设置false,那么鼠标点击不起作用,只有点击下边的TextView才会跳转页面。
3.新建tab01.xml页面,复制三个,只更改显示文本,作为切换页面。
tab01.xml页面:
<?xml version="1.0" encoding="utf-8"?>
<LinearLayout xmlns:android="http://schemas.android.com/apk/res/android"
  android:layout_width="match_parent"
  android:layout_height="match_parent"
  android:orientation="vertical" >

  <TextView
    android:layout_width="fill_parent"
    android:layout_height="fill_parent"
    android:text="Weixin Tab"
    android:textSize="30sp"
    android:textStyle="bold"
    android:gravity="center"/>
</LinearLayout>
4.activity_main.xml页面导入顶部和底部xml文件,并放置ViewPager。
activity_main.xml页面:
<LinearLayout xmlns:android="http://schemas.android.com/apk/res/android"
  xmlns:tools="http://schemas.android.com/tools"
  android:layout_width="match_parent"
  android:layout_height="match_parent"
  android:orientation="vertical">

  <include layout="@layout/top"/>

  <android.support.v4.view.ViewPager
    android:id="@+id/id_viewpager"
    android:layout_weight="1"
    android:layout_width="fill_parent"
    android:layout_height="0dp">

  </android.support.v4.view.ViewPager>
  <include layout="@layout/bottom"/>
</LinearLayout>
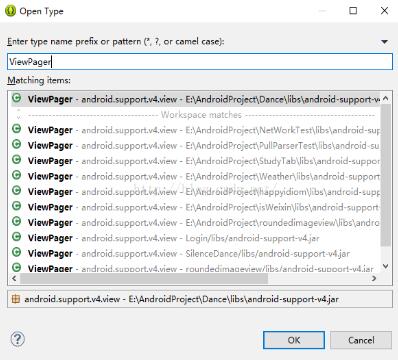
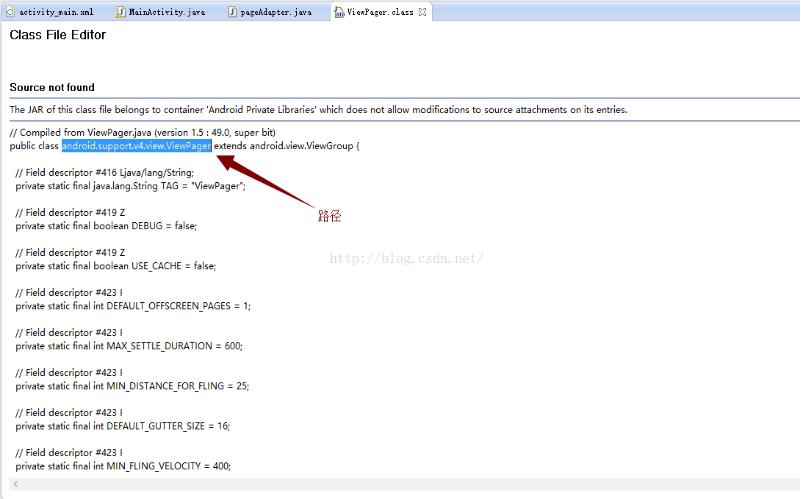
5.因为ViewPager是在jar包里,添加该控件需要写出路径,当记不住的时候,按下Ctrl+Shift+t,弹出框里输入“ViewPager”并选择,显示的页面中就包含该控件的路径。


6.新建pageAdapter.java,继承PageAdapter,实现四个方法。
pageAdapter.java页面:
package com.example.adapter;

import java.util.List;

import android.support.v4.view.PagerAdapter;
import android.view.View;
import android.view.ViewGroup;

public class pageAdapter extends PagerAdapter {
 private List<View> mViews;

 public pageAdapter(List<View> mViews) {
 this.mViews = mViews;
 }

 /**
 * 重写四个方法 boolean isViewFromObject(View arg0, Object arg1) int getCount()
 * void destroyItem(ViewGroup container, int position,Object object) Object
 * instantiateItem(ViewGroup container, int position)
 */

 // 从当前container中删除指定位置的view
 @Override
 public void destroyItem(ViewGroup container, int position, Object object) {
 container.removeView(mViews.get(position));
 }

 // 初始化view
 @Override
 public Object instantiateItem(ViewGroup container, int position) {
 View view = mViews.get(position);
 container.addView(view);
 return view;
 }

 @Override
 public boolean isViewFromObject(View arg0, Object arg1) {
 return arg0 == arg1;
 }

 // 返回要滑动的view个数
 @Override
 public int getCount() {
 return mViews.size();
 }

}
7.MainActivity.java页面编写点击和滑动事件。
MainActivity.java页面:
package com.example.studytab;

import java.util.ArrayList;
import java.util.List;

import com.example.adapter.pageAdapter;

import android.os.Bundle;
import android.app.Activity;
import android.support.v4.view.PagerAdapter;
import android.support.v4.view.ViewPager;
import android.support.v4.view.ViewPager.OnPageChangeListener;
import android.view.LayoutInflater;
import android.view.Menu;
import android.view.View;
import android.view.View.OnClickListener;
import android.view.ViewGroup;
import android.view.Window;
import android.widget.ImageButton;
import android.widget.LinearLayout;

public class MainActivity extends Activity implements OnClickListener {

 private ViewPager mViewPager;
 private List<View> mViews = new ArrayList<View>();
 private pageAdapter mAdapter = new pageAdapter(mViews);

 // Tab
 private LinearLayout mTabWeixin, mTabFriend, mTabTongxunlu, mTabSet;
 private ImageButton mWeixinImg, mFriendImg, mTongxunluImg, mSetImg;

 @Override
 protected void onCreate(Bundle savedInstanceState) {
 super.onCreate(savedInstanceState);
 requestWindowFeature(Window.FEATURE_NO_TITLE);// 去掉标题
 setContentView(R.layout.activity_main);

 initView();

 initEvents();
 }

 //View的滑动事件
 private void initEvents() {
 mTabWeixin.setOnClickListener(this);
 mTabFriend.setOnClickListener(this);
 mTabTongxunlu.setOnClickListener(this);
 mTabSet.setOnClickListener(this);

 //滑动切换页面
 mViewPager.setOnPageChangeListener(new OnPageChangeListener() {

  @Override
  public void onPageSelected(int arg0) {
  resetImg();  //将图片全部默认为不选中
  int currentItem = mViewPager.getCurrentItem();
  switch (currentItem) {
  case 0:
   mWeixinImg.setImageResource(R.drawable.search);
   break;
  case 1:
   mFriendImg.setImageResource(R.drawable.search);
   break;
  case 2:
   mTongxunluImg.setImageResource(R.drawable.search);
   break;
  case 3:
   mSetImg.setImageResource(R.drawable.search);
   break;

  default:
   break;
  }
  }

  @Override
  public void onPageScrolled(int arg0, float arg1, int arg2) {

  }

  @Override
  public void onPageScrollStateChanged(int arg0) {

  }
 });
 }

 //实例化控件
 private void initView() {
 mViewPager = (ViewPager) findViewById(R.id.id_viewpager);
 // Tab
 mTabWeixin = (LinearLayout) findViewById(R.id.tab_weixin);
 mTabFriend = (LinearLayout) findViewById(R.id.tab_friend);
 mTabTongxunlu = (LinearLayout) findViewById(R.id.tab_tongxunlu);
 mTabSet = (LinearLayout) findViewById(R.id.tab_set);
 // img
 mWeixinImg = (ImageButton) findViewById(R.id.tab_weixin_img);
 mFriendImg = (ImageButton) findViewById(R.id.tab_friend_img);
 mTongxunluImg = (ImageButton) findViewById(R.id.tab_tongxunlu_img);
 mSetImg = (ImageButton) findViewById(R.id.tab_set_img);

 LayoutInflater mInflater = LayoutInflater.from(this);
 View tab01 = mInflater.inflate(R.layout.tab01, null);
 View tab02 = mInflater.inflate(R.layout.tab02, null);
 View tab03 = mInflater.inflate(R.layout.tab03, null);
 View tab04 = mInflater.inflate(R.layout.tab04, null);

 mViews.add(tab01);
 mViews.add(tab02);
 mViews.add(tab03);
 mViews.add(tab04);

 mViewPager.setAdapter(mAdapter);
 }

 //ImageButton的点击事件
 @Override
 public void onClick(View view) {
 resetImg();
 switch (view.getId()) {
 case R.id.tab_weixin:
  mViewPager.setCurrentItem(0);// 跳到第一个页面
  mWeixinImg.setImageResource(R.drawable.search); // 图片变为选中
  break;
 case R.id.tab_friend:
  mViewPager.setCurrentItem(1);
  mFriendImg.setImageResource(R.drawable.search);
  break;
 case R.id.tab_tongxunlu:
  mViewPager.setCurrentItem(2);
  mTongxunluImg.setImageResource(R.drawable.search);
  break;
 case R.id.tab_set:
  mViewPager.setCurrentItem(3);
  mSetImg.setImageResource(R.drawable.search);
  break;

 default:
  break;
 }
 }

 // 将所有的图片切换为未选中
 private void resetImg() {
 mWeixinImg.setImageResource(R.drawable.study);
 mFriendImg.setImageResource(R.drawable.study);
 mTongxunluImg.setImageResource(R.drawable.study);
 mSetImg.setImageResource(R.drawable.study);
 }

}
8.运行就可以显示目标效果了。
以上就是本文的全部内容,希望对大家的学习有所帮助,也希望大家多多支持得得之家。
本站部分内容来源互联网,如果有图片或者内容侵犯您的权益请联系我们删除!
