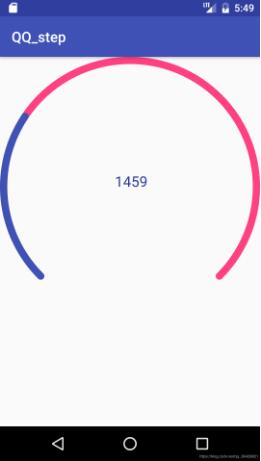
本文实例为大家分享了Android QQ运动步数的具体代码,供大家参考,具体内容如下
今天我们实现下面这样的效果:

首先自定义属性:
<?xml version="1.0" encoding="utf-8"?>
<resources>
  <declare-styleable name="MyQQStep">
    <attr name="out_color" format="color"/>
    <attr name="inner_color" format="color"/>
    <attr name="border_width" format="dimension"/>
    <attr name="text_size" format="dimension"/>
    <attr name="text_color" format="color"/>
  </declare-styleable>
</resources>
自定义View代码如下:
/**
 * Created by Michael on 2019/11/1.
 */

public class MyQQStep extends View {

  private int out_color;
  private int inner_color;
  private float width;
  private float textSize;
  private int color;
  private int width01;
  private int height01;
  private Paint outPaint;
  private Paint innerPaint;
  private Paint textPaint;

  private float percent;
  private int step;

  public MyQQStep(Context context) {
    this(context,null);
  }

  public MyQQStep(Context context, @Nullable AttributeSet attrs) {
    this(context, attrs,0);
  }

  public MyQQStep(Context context, @Nullable AttributeSet attrs, int defStyleAttr) {
    super(context, attrs, defStyleAttr);
    TypedArray array = context.obtainStyledAttributes(attrs,R.styleable.MyQQStep);
    out_color = array.getColor(R.styleable.MyQQStep_out_color, Color.BLACK);
    inner_color = array.getColor(R.styleable.MyQQStep_inner_color, Color.RED);
    width = array.getDimension(R.styleable.MyQQStep_border_width,10);
    textSize = array.getDimensionPixelSize(R.styleable.MyQQStep_text_size,20);
    color = array.getColor(R.styleable.MyQQStep_text_color, Color.GREEN);
    array.recycle();
    initPaint();
    percent = 0;
    step = 5000;
  }

  private void initPaint() {
    outPaint = new Paint();
    outPaint.setAntiAlias(true);
    outPaint.setStyle(Paint.Style.STROKE);
    outPaint.setStrokeWidth(width);
    outPaint.setColor(out_color);
    outPaint.setStrokeCap(Paint.Cap.ROUND);

    innerPaint = new Paint();
    innerPaint.setAntiAlias(true);
    innerPaint.setStrokeWidth(width);
    innerPaint.setStyle(Paint.Style.STROKE);
    innerPaint.setColor(inner_color);
    innerPaint.setStrokeCap(Paint.Cap.ROUND);

    textPaint = new Paint();
    textPaint.setAntiAlias(true);
    textPaint.setColor(color);
    textPaint.setStyle(Paint.Style.STROKE);
    textPaint.setTextSize(textSize);

  }

  @Override
  protected void onMeasure(int widthMeasureSpec, int heightMeasureSpec) {
    //super.onMeasure(widthMeasureSpec, heightMeasureSpec);
    int widthMode = MeasureSpec.getMode(widthMeasureSpec);
    int heightMode = MeasureSpec.getMode(heightMeasureSpec);
    if (widthMode == MeasureSpec.AT_MOST){

    }else{
      width01 = MeasureSpec.getSize(widthMeasureSpec);
    }
    if (heightMode == MeasureSpec.AT_MOST){

    }else{
      height01 = MeasureSpec.getSize(heightMeasureSpec);
    }
    setMeasuredDimension((width01>height01?height01:width01)
        ,(width01>height01?height01:width01));
  }

  @Override
  protected void onDraw(Canvas canvas) {
    super.onDraw(canvas);
    int realWidth = getWidth()>getHeight()?getHeight():getWidth();
    int realHeight = getWidth()>getHeight()?getHeight():getWidth();
    RectF r1 = new RectF(width/2,width/2,realWidth-width/2
        ,realHeight-width/2);
    canvas.drawArc(r1,135,270,false,outPaint);
    canvas.drawArc(r1,135,270*percent,false,innerPaint);

    Rect r = new Rect();
    String s = step+"";
    textPaint.getTextBounds(s,0,s.length(),r);
    int textWidth = r.width();
    int textHeight = r.height();
    Paint.FontMetricsInt fontMetricsInt = new Paint.FontMetricsInt();
    int dy = (fontMetricsInt.bottom-fontMetricsInt.top)/2-fontMetricsInt.bottom;
    int baseLine = textHeight/2+dy+realHeight/2-textHeight/2;
    int x0 = realWidth/2-textWidth/2;
    canvas.drawText(s,x0,baseLine,textPaint);

  }

  public void setPercent(float percent,float value){
    this.percent = percent;
    this.step = (int) value;
    invalidate();
  }


}
最后在布局以及MainActivity中调用:
<com.example.qq_step.MyQQStep
    android:id="@+id/qq_step"
    android:layout_width="match_parent"
    android:layout_height="match_parent"
    app:out_color="@color/colorAccent"
    app:border_width="10dp"
    app:inner_color="@color/colorPrimary"
    app:text_size="20sp"
    app:text_color="@color/colorPrimaryDark"
    />
 private void initView() {
    final MyQQStep qq_view = findViewById(R.id.qq_step);
    ValueAnimator animator = ValueAnimator.ofFloat(0,5000);
    animator.addUpdateListener(new ValueAnimator.AnimatorUpdateListener() {
      @Override
      public void onAnimationUpdate(ValueAnimator animation) {
        float p = animation.getAnimatedFraction();
        qq_view.setPercent(p,5000*p);
      }
    });
    animator.setDuration(10000);
    animator.start();

  }
以上就是本文的全部内容,希望对大家的学习有所帮助,也希望大家多多支持得得之家。
本站部分内容来源互联网,如果有图片或者内容侵犯您的权益请联系我们删除!
