简述
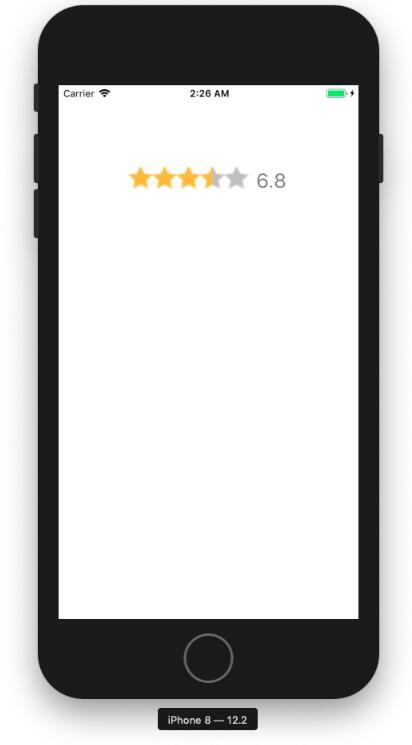
在仿写豆瓣的时候,发现了根据评分不同,星级数也不同的星级条。

百度一搜,发现Android有自带控件UIRatingBar,而iOS得要自己写…好吧,那就写吧。
图片素材
首先,要准备三张图片,图片如下:
空星,半星,全星

因为我们可以看到,在豆瓣的评分星级条里,只有空、半、全星,所以只需要准备这3种图片。
思路
豆瓣的星级条中既有图片,又有文字,所以我们自定义一个继承于UIView的starView。
初始化方法
因为星级条要根据评分的数据来决定星的颗数,所以我们要重新创建一个初始化方法:
//在starView.m中写

- (instancetype)initWithFrame:(CGRect)frame score:(double)score;


//在starView.h中对其进行操作实现
- (instancetype)initWithFrame:(CGRect)frame score:(double)score{
 self = [super initWithFrame:frame];
 //记得把传过来的score赋值给全局变量_starScore
 _starScore = score;
 return self;
}这样,我们就可以在ViewController.m中利用此方法初始化一个星级条视图:
starView *star = [[CJTStarView alloc] initWithFrame:CGRectMake(100, 100, 200, 50) score:6.8];此处的score可以改成根据网络请求得到的评分数据。
根据添加星星图片
在这里,我设置的分数与星星的对应关系如下:
4.6-5.5 2.5颗星
5.6-6.5 3颗星
6.6-7.5 3.5颗星
7.6-8.5 4颗星
8.6-9.5 4.5颗星
而因为我们只有5颗星,所以对分数做如下处理:
_starScore = (_starScore / 2 - 0.3);接下来就是用循环添加图片到view上,因为我们有三种图片,所以在循环中还要加判断,代码如下:
for (int count = 0; count < 5; count++) {
 UIImageView *starImageView = [[UIImageView alloc] init];
 starImageView.frame = CGRectMake(count * self.frame.size.height, 0, self.frame.size.height, self.frame.size.height);
 [self addSubview:starImageView];
 if (count <= _starScore - 0.5) {
  starImageView.image = [UIImage imageNamed:@"stars_full"];
 } else {
  if (_starScore - count >= 0 && _starScore - count < 0.5) {
  starImageView.image = [UIImage imageNamed:@"stars_half"];
  } else {
  starImageView.image = [UIImage imageNamed:@"stars_empty"];
  }
 }
 }
这里的判断条件是数学问题,就不详细讲了。
当然,如果分数与星星的对应规则和我不同,那么就要适当修正这里的判断条件。
在星级条后添加分数
在豆瓣到星级条后面还有分数,因此我们在view中添加一个UILabel对象。
UILabel *scoreLabel = [[UILabel alloc] init];
 scoreLabel.frame = CGRectMake( 5 * self.frame.size.height + 10, 8, self.frame.size.width - 5 * self.frame.size.height - 10, self.frame.size.height - 8);
 scoreLabel.text = [NSString stringWithFormat:@"%.1f", _starScore];
 scoreLabel.textColor = [UIColor grayColor];
 scoreLabel.font = [UIFont systemFontOfSize:25];
这里要注意,因为我们在设置星级图的时候会修改_starScore的值,所以要在添加星星图片之前设置UILabel。
效果图
最后做出来到效果如下:

以上就是本文的全部内容,希望对大家的学习有所帮助,也希望大家多多支持得得之家。
本站部分内容来源互联网,如果有图片或者内容侵犯您的权益请联系我们删除!
