一、概述
1、对于经常使用的控件或类,通常将其分装为一个单独的类来供外界使用,以此达到事半功倍的效果
2、由于分装的类不依赖于其他的类,所以若要使用该类,可直接将该类拖进项目文件即可
3、在进行分装的时候,通常需要用到代理设计模式
二、代理设计模式
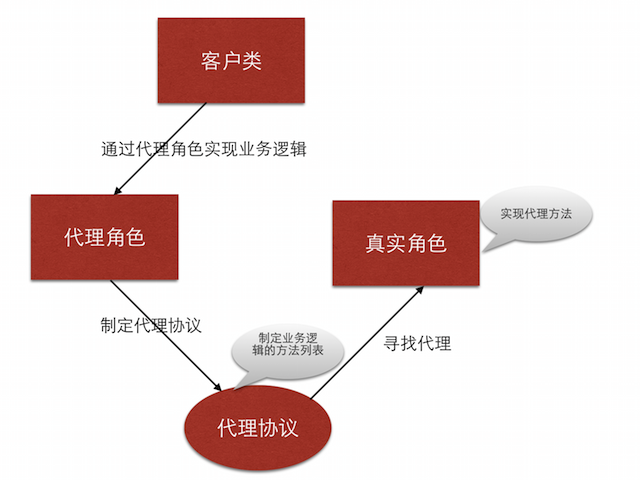
1、代理设计模式的组成
客户类(通常作为代理):通常委托这是角色来完成业务逻辑
真实角色:将客户类的业务逻辑转化为方法列表,即代理协议
代理协议:
- 定义了需要实现的业务逻辑
- 定义了一组方法列表,包括必须实现的方法或选择实现的方法
- 代理协议是代理对象所要遵循一组规则
代理角色
- 若要作为代理,需要遵守代理协议,并且实现必须实现的代理方法
- 代理角色可以通过调用代理协议中的方法完成业务逻辑,也可以附加自己的操作
文字描述通常是抽象的,一下通过图示来阐述代理设计模式

三、自定义布局类的封装
1、业务逻辑
如图

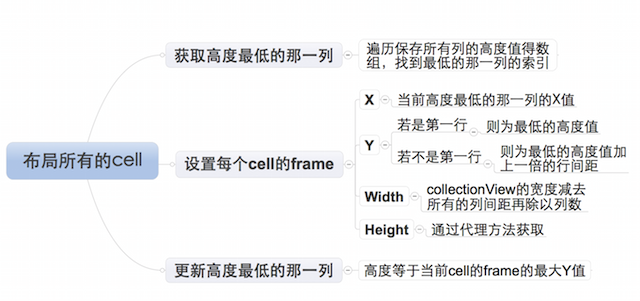
2、布局每个cell的业务逻辑
由于设置每个cell的布局属性的业务逻辑较复杂,特附上如下思维导图

3、封装思路封装需要根据客户类业务逻辑需求来提供接口
1)、通过代理协议的可选实现的方法获取的属性值的属性,需要设置默认值
2)、未提供默认值的且必须使用的属性,需要通过必须实现的方法来获得
3)、自定义布局提供的接口可选
- 列数
- 列之间的间距
- 行之间的间距
- 内边距
4)、自定义布局提供的接口必选
每个元素的高度,宽度可以通过列数和列间距计算得到
四、封装步骤
设置代理协议,提供接口
//声明LYPWaterFlowLayout为一个类
@class LYPWaterFlowLayout;
@protocol LYPWaterFlowLayoutDelegate <NSObject>
//必须实现的方法
@required
/**获取瀑布流每个元素的高度*/
- (CGFloat)waterFlowLayout:(LYPWaterFlowLayout *)waterFlowLayout heightForItemAtIndex:(NSInteger)index itemWith:(CGFloat)itemWith;
//可选实现的方法
@optional
/**获取瀑布流的列数*/
- (NSInteger)columnCountInWaterFlowLayout:(LYPWaterFlowLayout *)waterFlowLayout;
/**获取瀑布流列间距*/
- (CGFloat)columnMarginInWaterFlowLayout:(LYPWaterFlowLayout *)waterFlowLayout;
/**获取瀑布流的行间距*/
- (CGFloat)rowMarginInWaterFlowLayout:(LYPWaterFlowLayout *)waterFlowLayout;
/**获取瀑布流的内边距*/
- (UIEdgeInsets)edgeInsetsInWaterFlowLayout:(LYPWaterFlowLayout *)waterFlowLayout;
@end
设置代理属性
@interface LYPWaterFlowLayout : UICollectionViewLayout
/**代理*/
@property (nonatomic, weak) id<LYPWaterFlowLayoutDelegate> delegate;
@end
设置通过可选代理方法获取属性值的属性的默认值
/**默认的列数*/
static const NSInteger LYPDefaultColumnCount = 3;
/**默认每一列之间的间距*/
static const CGFloat LYPDefaultColumMargin = 10;
/**默认每一行之间的间距*/
static const CGFloat LYPDefaultRowMargin = 10;
/**默认边缘间距*/
static const UIEdgeInsets LYPDefaultEdgeInsets = {10, 10, 10, 10};
设置通过可选代理方法获取属性值的属性的访问方式若代理提供属性值,则忽略默认值
- (NSInteger)columnCount
{
  //判断代理是否实现了获取列数的可选方法
  if ([self.delegate respondsToSelector:@selector(columnCountInWaterFlowLayout:)])
  {
    //实现,返回通过代理设置的列数
    return [self.delegate columnCountInWaterFlowLayout:self];
  }
  else
  {
    //为实现,返回默认的列数
    return LYPDefaultColumnCount;
  }
}
注:其他属性值的获取与上述方法几乎完全相同,不再赘述
设置布局
1)、设置需要的成员属性
/**所有cell的布局属性*/
@property (nonatomic, strong) NSMutableArray *attrsArray;
/**所有列的当前高度*/
@property (nonatomic, strong) NSMutableArray *columnHeights;
2)、通过懒加载的方式初始化成员属性
/**--attrsArray--懒加载*/
- (NSMutableArray *)attrsArray
{
  if (_attrsArray == nil)
  {
    _attrsArray = [NSMutableArray array];
  }
  return _attrsArray;
}
/**--columnHeights--懒加载*/
- (NSMutableArray *)columnHeights
{
  if (_columnHeights == nil)
  {
    _columnHeights = [NSMutableArray array];
  }
  return _columnHeights;
}
3)、初始化布局
- (void)prepareLayout
{
  [super prepareLayout];

  /**清除之前跟布局相关的所有属性,重新设置新的布局*/
  //清除之前计算的所有列的高度
  [self.columnHeights removeAllObjects];
  //设置所有列的初始高度
  for (NSInteger i = 0; i<self.columnCount; i++)
  {
    self.columnHeights[i] = @(self.edgeInsets.top);
  }
  //清除之前所有的布局属性
  [self.attrsArray removeAllObjects];

  /**开始创建每一个cell对应的布局属性*/
  NSInteger count = [self.collectionView numberOfItemsInSection:0];
  for (NSInteger i = 0; i<count; i++)
  {
    NSIndexPath *indexPath = [NSIndexPath indexPathForItem:i inSection:0];
    //获取indexPath位置cell对应的布局属性
    UICollectionViewLayoutAttributes *attrs = [self layoutAttributesForItemAtIndexPath:indexPath];
    //将indexPath位置的cell的布局属性添加到所有cell的布局属性数组中
    [self.attrsArray addObject:attrs];
  }
}
4)、返回包含所有cell的布局属性的数组
- (nullable NSArray<UICollectionViewLayoutAttributes *> *)layoutAttributesForElementsInRect:(CGRect)rect
{
  return self.attrsArray;
}
设置每一个cell的布局属性

- (nullable UICollectionViewLayoutAttributes *)layoutAttributesForItemAtIndexPath:(nonnull NSIndexPath *)indexPath
{
  //获取indexPath位置的布局属性
  UICollectionViewLayoutAttributes *attrs = [UICollectionViewLayoutAttributes layoutAttributesForCellWithIndexPath:indexPath];

  /**设置cell布局属性的frame*/

  /***确定cell的尺寸***/
  //获取collectionView的宽度
  CGFloat collectionViewWidth = self.collectionView.frame.size.width;
  //cell宽度
  CGFloat width = ((collectionViewWidth - self.edgeInsets.left - self.edgeInsets.right - (self.columnCount - 1) * self.columMargin)) / self.columnCount;
  //cell高度
  CGFloat height = [self.delegate waterFlowLayout:self heightForItemAtIndex:indexPath.item itemWith:width];

  /***设置cell的位置***/
  NSInteger destColumn = 0;
  CGFloat minColumnHeight = [self.columnHeights[0] doubleValue];
  for (NSInteger i = 1; i<self.columnCount; i++)
  {
    CGFloat columnHeight = [self.columnHeights[i] doubleValue];
    if (minColumnHeight > columnHeight)
    {
      minColumnHeight = columnHeight;
      destColumn = i;
    }
  }
  //计算cell的位置
  CGFloat x = self.edgeInsets.left + destColumn * (width + self.columMargin);
  CGFloat y = minColumnHeight;
  //判断是不是第一行
  if (y != self.edgeInsets.top)
  {
    //若不是第一行,需要加上行间距
    y += self.rowMargin;
  }

  /**给cell的布局属性的frame赋值*/
  attrs.frame = CGRectMake(x, y, width, height);

  //更新最短那列的高度
  self.columnHeights[destColumn] = @(CGRectGetMaxY(attrs.frame));

  /**返回indexPath位置的cell的布局属性*/
  return attrs;
}
5)、设置collectionView内容的尺寸
- (CGSize)collectionViewContentSize
{
  //获取最高的那一列的高度
  CGFloat maxColumnHeight = [self.columnHeights[0] doubleValue];
  for (NSInteger i = 1; i<self.columnCount; i++)
  {
    CGFloat columnHeight = [self.columnHeights[i] doubleValue];
    if (maxColumnHeight < columnHeight)
    {
      maxColumnHeight = columnHeight;
    }
  }
  //返回collectionView的contentSize,高度为最高的高度加上一个行间距
  return CGSizeMake(0, maxColumnHeight + self.rowMargin);
}
以上就是本文的全部内容,希望对大家的学习有所帮助。
本站部分内容来源互联网,如果有图片或者内容侵犯您的权益请联系我们删除!
