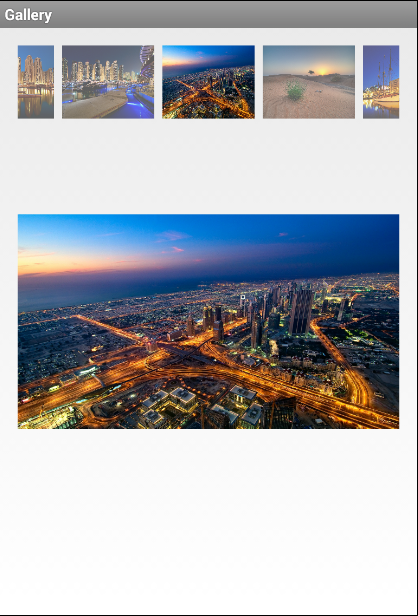
效果如下:

布局文件activity_main.xml如下:
<RelativeLayout xmlns:android="http://schemas.android.com/apk/res/android"
  xmlns:tools="http://schemas.android.com/tools"
  android:layout_width="match_parent"
  android:layout_height="match_parent"
  android:paddingBottom="@dimen/activity_vertical_margin"
  android:paddingLeft="@dimen/activity_horizontal_margin"
  android:paddingRight="@dimen/activity_horizontal_margin"
  android:paddingTop="@dimen/activity_vertical_margin"
  tools:context=".MainActivity" >
  <ImageSwitcher
    android:id="@+id/imageSwitcher"
    android:layout_width="wrap_content"
    android:layout_height="wrap_content"
    android:layout_weight="2"
    android:paddingTop="30px" >
  </ImageSwitcher>
  <Gallery
    android:id="@+id/gallery1"
    android:layout_width="match_parent"
    android:layout_height="wrap_content"
    android:layout_weight="1"
    android:spacing="5px"
    android:unselectedAlpha="0.6" />
</RelativeLayout>
MainActivity.java代码如下:
import android.app.ActionBar.LayoutParams;
import android.app.Activity;
import android.os.Bundle;
import android.view.View;
import android.view.animation.AnimationUtils;
import android.widget.AdapterView;
import android.widget.AdapterView.OnItemSelectedListener;
import android.widget.Gallery;
import android.widget.ImageSwitcher;
import android.widget.ImageView;
import android.widget.ViewSwitcher.ViewFactory;
public class MainActivity extends Activity {
  private int imageId[] = new int[] { R.drawable.a, R.drawable.b,
      R.drawable.c, R.drawable.d, R.drawable.e, R.drawable.f,
      R.drawable.g, R.drawable.h, R.drawable.i, R.drawable.j,
      R.drawable.k };
  private ImageSwitcher imageSwitcher;
  private Gallery gallery;
  @Override
  protected void onCreate(Bundle savedInstanceState) {
    super.onCreate(savedInstanceState);
    setContentView(R.layout.activity_main);
    imageSwitcher = (ImageSwitcher) this.findViewById(R.id.imageSwitcher);
    gallery = (Gallery) this.findViewById(R.id.gallery1);
    // 设置动画效果
    imageSwitcher.setInAnimation(AnimationUtils.loadAnimation(this,
        android.R.anim.fade_in));
    imageSwitcher.setOutAnimation(AnimationUtils.loadAnimation(this,
        android.R.anim.fade_out));
    imageSwitcher.setFactory(new ViewFactory() {
      @Override
      public View makeView() {
        ImageView imageView = new ImageView(MainActivity.this);
        imageView.setScaleType(ImageView.ScaleType.FIT_CENTER); // 设置保持纵横比居中
        imageView.setLayoutParams(new ImageSwitcher.LayoutParams(
            LayoutParams.WRAP_CONTENT, LayoutParams.WRAP_CONTENT));
        return imageView;
      }
    });
    GalleryAdapter adapter = new GalleryAdapter(MainActivity.this,imageId);
    gallery.setAdapter(adapter);
    gallery.setSelection(imageId.length / 2);
    gallery.setOnItemSelectedListener(new OnItemSelectedListener() {
      @Override
      public void onItemSelected(AdapterView<?> parent, View view,int position, long id) {
        imageSwitcher.setImageResource(imageId[position]);
      }
      @Override
      public void onNothingSelected(AdapterView<?> arg0) {
      }
    });
  }
}
其中需要的一个适配器:
import android.content.Context;
import android.content.res.TypedArray;
import android.view.View;
import android.view.ViewGroup;
import android.widget.BaseAdapter;
import android.widget.Gallery;
import android.widget.ImageView;
public class GalleryAdapter extends BaseAdapter {
  private int[] imageId;
  private Context mContext;
  /**
   * 穿入上下文和图片资源数组
   * @param mContext
   * @param imageId
   */
  public GalleryAdapter(Context mContext, int[] imageId) {
    this.mContext = mContext;
    this.imageId = imageId;
  }
  @Override
  public int getCount() {
    return imageId.length;
  }
  @Override
  public Object getItem(int position) {
    return imageId[position];
  }
  @Override
  public long getItemId(int position) {
    return position;
  }
  @Override
  public View getView(int position, View convertView, ViewGroup parent) {
    ImageView imageView1;
    if (convertView == null) {
      imageView1 = new ImageView(mContext);
      imageView1.setScaleType(ImageView.ScaleType.FIT_XY);
      imageView1.setLayoutParams(new Gallery.LayoutParams(180, 135));
      TypedArray typedArray = mContext
          .obtainStyledAttributes(R.styleable.Gallery);
      imageView1.setBackgroundResource(typedArray.getResourceId(
          R.styleable.Gallery_android_galleryItemBackground, 0));
      imageView1.setPadding(5, 0, 5, 0); // 设置ImageView的内边距
    } else {
      imageView1 = (ImageView) convertView;
    }
    imageView1.setImageResource(imageId[position]); // 为ImageView设置要显示的图片
    return imageView1; // 返回ImageView
  }
}
到此 OK!
总结
以上就是这篇文章的全部内容了,希望本文的内容对大家的学习或者工作具有一定的参考学习价值,谢谢大家对得得之家的支持。如果你想了解更多相关内容请查看下面相关链接
本站部分内容来源互联网,如果有图片或者内容侵犯您的权益请联系我们删除!
